
Boring is a simple technique if all you want to do is enlarge a preexisting shaft. We also wouldn’t have to be concerned with the tool’s additional settings. When you’ve had to consider a certain dimension with a critically reflective, though, anything counts. Let’s find out more about how to use a boring bar on a lathe.
Almost everything is precise and valuable, from monotonous bar choice to chip evacuation. This is why experts claim that if you want a perfect drilling on the lathe bore, you should have a minor OCD issue.
Understanding how to operate the boring bar is essential for a successful boring procedure on how to use a boring bar on a mill. The topic of today’s post is how to use a boring bar on a lathe.
Boring Bar on the Lathe
Boring is a common type of lathe activity. If you have a tiny lathe, you can accomplish this. Implementing a few steps is essential for a good surgery. As a result, we’re going to go through how to use a boring bar on a lathe.
Step 1: Choose a Boring Bar
Using a boring bar comes in three main varieties, each with its unique set of features and advantages on deep boring on a lathe-like Grizzly G8688.
Steel with a high speed of rotation (HSS)
HSS is both less expensive and more durable. Unless the sharp edges are worn out, they may be readily re-tipped using a regular sander and sharpening stones.
Carbide Boring Bar Brazed
It does have a cutting speed of 2.5 to 5 times that of HSS. This lathe boring technique implies it can withstand a lot of heat. Metal has a stiffness factor of 2.5 times that of brazed carbide. However, as the sharp edges of this form of boring lathe wear out, it must be reprocessed (that is very hard) or destroyed.
Boring Bar with Indexable Carbide
It’s similar to HSS, except the diameter of the cutting edge has a lower corner radius, resulting in a superior surface polish. This even generates a more precise bore size. Roughing is best done using a leading edge with a big corner radius.
As a result, must pick an ideal using a boring bar for your production accuracy how to use a boring head on a lathe. The essential to the tedious procedure is rigidity. To use a deep boring on a lathe with both the greatest diameter and lowest extended lengths is a great way to improve rigidity.
However, if you want to know about the midi lathe, and want to check out some best midi lathe, then you can check it out.
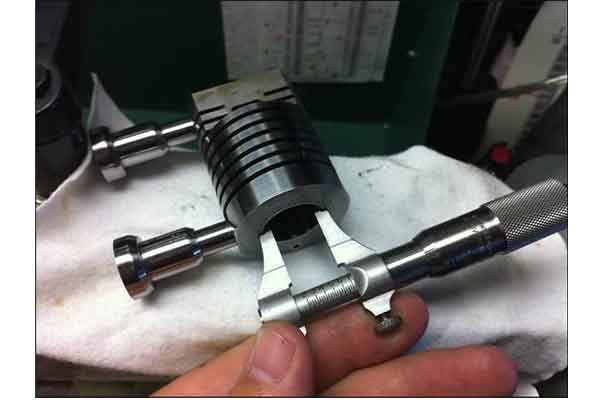
Step 2: Boring Bar Measurement
When utilizing a lathe machine, it is also vital to determine the accurate amount of the boring bar. Because the criteria differ from one product to the next. As a consequence, selecting the ideal bar length will get an accurate result on the lathe bore.
A variety of instruments may be used to measure the boring bar:
• Calipers, dial, or digital
• Gage for Small Holes
• Pins for Gage
• Gages for Bores
• Gages with Telescoping Arms
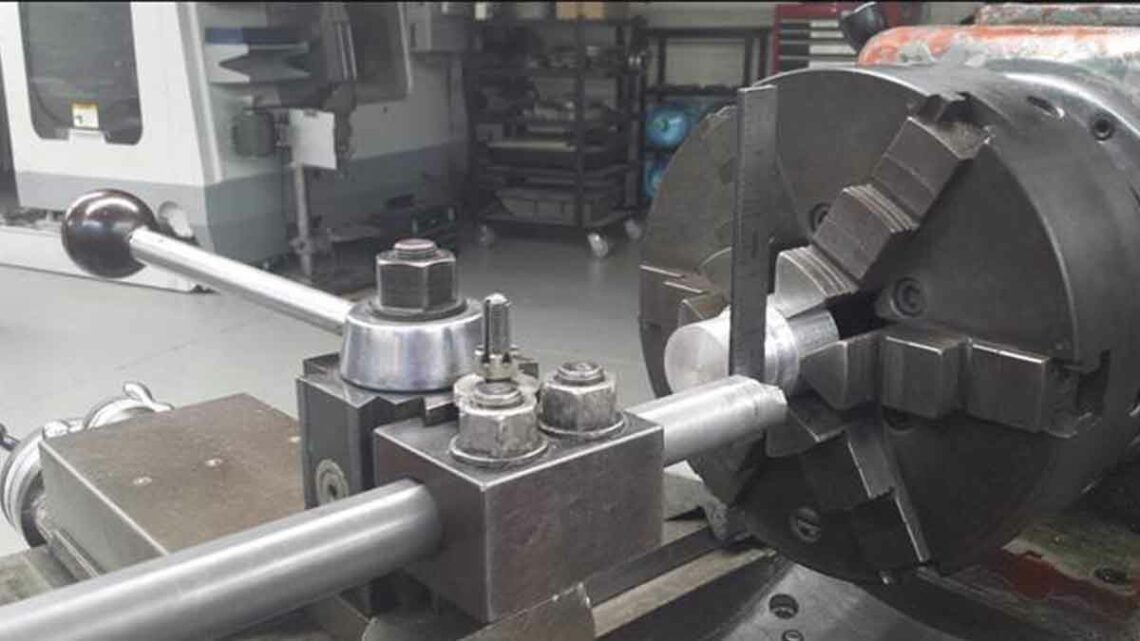
Step 3: Installing the bar
The steps for how to set up a boring bar on a lathe are as follows:
Boring bars are divided into three categories: increased steel, brazed carbide, and index-able carbide. HSS has the advantage of being less expensive and more durable.
Tungsten has the advantage of being able to withstand significantly higher heat (i.e., it can cut 2.5–5 times quicker than HSS) and having a stiffness modulus that is around 2.5 times that of steel of lathe-like Jet 1440.
Getting Started of how to use a boring bar on a lathe and lathe boring bar setup
Boring bars, on average, do not feature alignment’s flatness. As a result, the upper part of the harsh edge must be perpendicular to the lathe’s XZ plane.
It bears mentioning: rigidity is critical in boring, as it is in other metal cutting operations, therefore do all you can to increase it: use the greatest diameter lathe bore and the shortest extension length feasible.
The boring bar may be oriented in three different ways. Minus rake, moderate rake, and optimistic rake are the three options. The best plan among these three is neutral. However, you must position the tooltip on the vertical spindle centerline if you wish to test any other of the rotations.
While many boring bars lack realignment flats, it’s important to connect the top (flat) face of the cutting edge with the lathe’s XZ plane, as seen in figure 6. The safest orientation is neutral (B), but if you want to try anything else, make sure you have enough cut tip leeway and that the tooltip is aligned with the horizontal spindle axis.
Neutral rakes are used to cut exotic alloys like high potency steels, whereas positive rakes are being used to cut weaker substances such as aluminum and polymers.
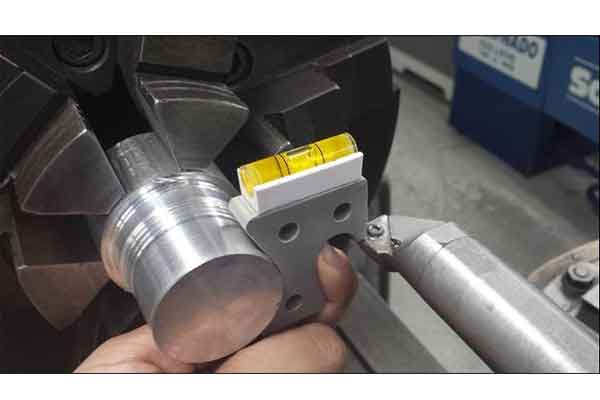
Boring bar blade elevation, like all other instruments on the lathe, should always be examined and modified to be as near to the vertical spindle centerline as feasible.
Always presume that a boring tool in a lathe machine is correctly configured simply since it is in the lathe cabinet for the machine you’re operating! The boring bar will just not cut effectively if it is not vertically center line, and it will be destroyed during use.
Make sure you’ve left enough room for the cutting tip to move around.
Strong rakes are suitable for producing weak substances like aluminum and polymers. Reverse racks are also useful for cutting tougher substances like high-strength steel.
Cutting Parameters Selection
TIP: When utilizing lathe boring bar set up, focus on cutting at half the normal calculated value and gradually build up if vibrations and tool life allows. The main causes include the lower rigidity of boring bars owing to their overhanging form, and also the challenge of delivering regular lubricating to the cutting edge of the instrument and chip assessment from it because flood chilling is used, as in a CNC lathe (how to set up a boring bar on a CNC lathe).
TIP: For something like a boring bar, a nice addition cutting depth is double the corner diameter. Also, it’s vital to remember that there’s an extremely secure thickness of cut beyond which the instrument alternates among cutting and smearing, resulting in highly irregular size and quality. Based on the conditions, this extremely secure cut depth ranges from 0.002” to 0.005”. Extremely hard materials can generally tolerate a shallower reduced feature depth.
TIP: A fourth of the aspect ratio is a nice addition federate for a boring bar.
A certain height of how to set up a boring bar on a lathe-like Grizzly g0462.
Another important consideration when putting up a boring tool on the lathe is length. Pick a good plain bar with a sufficient height adjustment. That is, as similar as possible to the vertical spindle center.
Keep a close eye on the bar as it’s being set up. Because the boring bar isn’t on the horizontal midline, it won’t match the size you want. You will not only be sorry for your mistake, but you will also irreparably harm the bar.
However, if you want to check out some best Powermatic lathes, then this could be your choice.
Step 4: choosing the Cutting Parameters
Here are some things to think about before choosing a variable.
Cutting Rate
The preferred rotational speed for boring bars ought to be half of the calculated value. However, if the tool life permits, you may always operate at a higher speed than the standard-setting. We are in the middle of the article on how to use a boring bar on a lathe. And we’ve got more going on here.
Cutting Depth
The depth of cut, like spindle force, is a crucial element for the boring on a lathe. It is twice the corners radius of a milling machine for the boring bar, which is regarded as the maximum safe depth of cut.
0.1-0.2 mm depth of incision is thought to be the healthiest, based on the conditions. And, depending on the material, its shortest-path depth is roughly 0.002-0.005 mm.
Remember that if you cut underneath the required cutting speed, the size and appearance will be quite uneven. Also because tool shift among cut and spreading is continuous.
If you want to know about some beginner wood lathe, then you can check it out.
Rate of Feeding
A boring bar’s optimum flow rate is one among the aspect ratio.
How to bore a hole on a lathe: Ideology for Consistent Outcomes
When utilizing boring bars, uniformity is essential for attaining reproducible results. To put it another way, you want to change as few variables as feasible throughout each cut, ideally just one at a time.
Everything which changes the cutting force at the workpiece surface influences the number of items eliminated or the material polish achieved: cutting depth, learn and recall, lubrication, corner radius, part temperature, and so on.
Let us just pretend you’re attempting to drill a 1″ hole in 303 stainless steel. One strategy may be as continues to follow:
1.
Drill the same or more stuff as possible even though it is the most effective material removal approach. Make careful to leave adequate stock for the following step while doing this. In this situation, the bore should be roughly 0.050” small.
However, you can take a look at Bolton lathe review, if you have spare time.
2.
Evaluate the boring bar’s cutting ability with a few test cuts. A dull bar will seldom cut correctly. Assuming you decide to control 0.010” from the bore’s diameter, you could only get 0.0096” on the very first pass and 0.0004” on the second.
(A spring pass is just a second run that compensates for deflection of the tool or component during the first pass on metal lathe boring bar.) Make a few passes and note down how much each one eliminates so you can balance it out and understand what to anticipate when it counts.
3.
Don’t attempt to get away with a smaller ultimate size. Due to the extreme extremely secure depth of cut explained in Step 3 above, better outcomes are not gained by creating the smallest possible cuts until you reach the target size, as counterintuitive as it may appear.
The greatest outcomes are obtained by eliminating a comparable quantity of material on each pass and making slight modifications to every following run using the sensor readings collected. To get the 1” 303 sample piece into function following specification, the final cut would subtract 0.005” to 0.010” from the diameter.
Bore measuring is the fifth step on how to use a boring bar on a lathe
Bore measures may be taken using a variety of tools, depending on the budget, operator competence, and measurement precision needed.
You can read top mini wood lathe if you are interested!
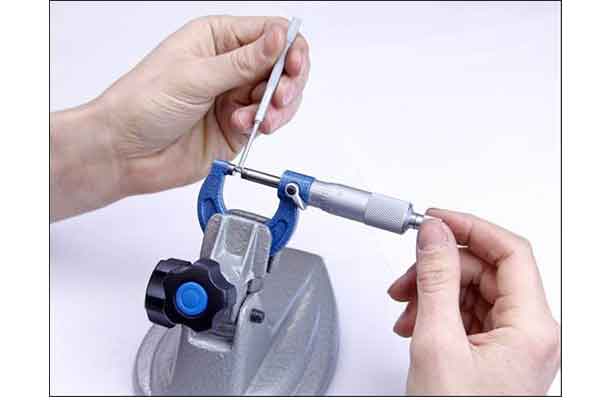
Caliper brakes, dial, or electronic
Dial calipers are the easiest and least precise instrument for bore measuring. Since these inner jaws have flats hammered into them, they can’t measure the exact size of the hole, these aren’t particularly precise (within a few thousandths of an inch) on tiny metal lathe boring bar.
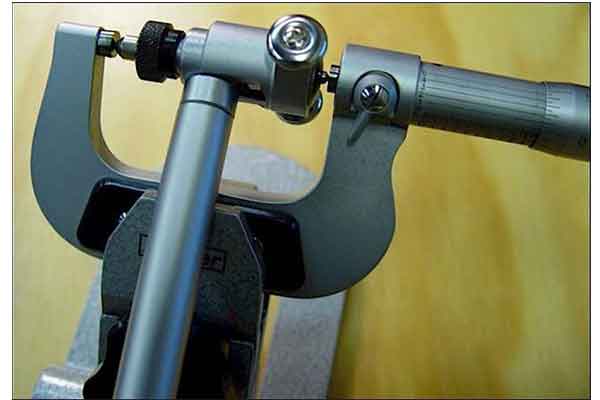
Micrometers on the inside.
Some inside micrometer is the 2nd instrument of using. Inner mics, on the other hand, are often only useful for measuring shallow bores up to 3 inches in diameter. They have a precision of +/-0.001”.
Gages for small holes.
Little hole strain gauges are then put into a bore until a small drag force is sensed and then measured with external microphones. Small gages are precise to +/-0.002” when used in delicate hands.
Gage Pins are a kind of gauge.
Precise holes may also be measured using gauge pins. Gage pins are available in almost any size and are normally made (precise ground) to a tolerance of +/-0.0002”.
Gages with Telescoping Arms
Retractable gages are routinely used to evaluate boring bar lathes, but providing consistent and precise readings requires a high level of user competence. A tiny rotational speed is imparted to a friction lock after it is put into the bore, then the telescoping gage is swept across the bore’s center and recorded using a millimeter.
The difficulty is providing the right amount of torque to the friction lock since too little causes the gage to distort and show a number that is bigger than the real bore size when withdrawn, but too much causes the gage to deform and show a number that is bigger than the real bore size.
It can be said that on, how to use a boring bar on a lathe –only one method towards becoming skilled in the use of telescoping gages, like other measuring instruments, is to practice on a bore of known size (such as a bearing race). Telescoping bore gages are precise to +/- 0.0015 when used in delicate hands.
Bore Gages are a kind of bore gauge.
Hole gages are precise telescopic gages with constructed dial indications. They are certified just to use an external micrometer firstly, and afterward, the real bore diameter is measured with the dial indicator in relation to that calibration. Bore gages have a +/-0.0005” accuracy.
Usage of Cutting Tools
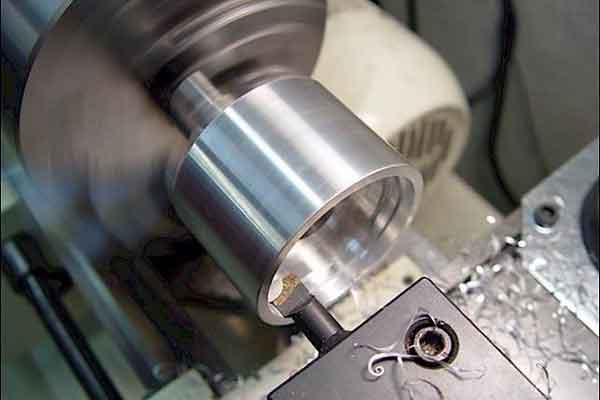
Boring, sometimes referred to as internal twisting, is a method of increasing a hole’s interior diameter. It might be a cored hole in casting or a hole drilled with a drill. Bore accomplishes three goals:
Dimensions:
Boring enlarges and finishes the hole to the desired size and finishes on a boring bar lathe. Because of the required size is “standard” or if specific lathe tools were produced may a drill or reamer be used? By regulating the rate, feed, and nose radius, the boring equipment may operate on any diameter and provide the desired finish. Micro variable boring bars may be used to bore precise holes.
Effortlessness:
Boring straightens the hole that was previously drilled or cast. Due to various eccentricity pressures on the drill, infrequent hard places in the substance, or unequal sharpness of the hole, drilling, particularly the lengthier one, may stray off again and cut at a tiny angle. Molding cored perforations are nearly rarely perfectly straight.
These faults will be corrected by moving the boring tool straight along the routes with the carriages feed.
Concentricity is a term that refers to the ability to concentrate
Inside the constraints of the chuck or holding device’s precision, boring will make the hole symmetrical with the circumference. Both turning of the outside diameter and the drilling of the width are done in one set-up for optimal concentricity, that is, while transferring the work among processes.
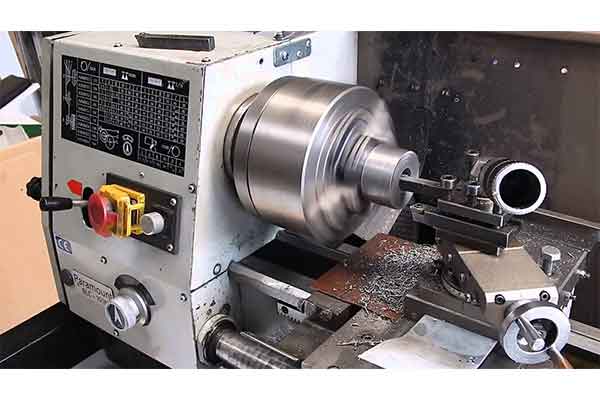
Boring, on the other side, has a number of constraints that must be considered in order to achieve a high stock percentage removal while maintaining average performance, material polish, and tool life. As a result, the restrictions that separate internal from outside shifting will be examined in more depth in this chapter. The image below depicts the basic boring operation.
Boring Projects Boring includes the majority of the turning activities found in exterior turning. The length of the workpiece has no bearing on the tool overhanging for outside turning, and the tool holder may be selected to handle the pressures and tensions that emerge throughout the process. Internally turning, or boring, on the other hand, is limited by the hole diameter and length of the workpiece.
To achieve the highest steadiness and hence precision, a common guideline that applies to all machining is to limit tool lag. The overhang is determined by the depth of the hole while drilling. Whenever the bigger tool width is used, the steadiness improves, but the options are still restricted since the space permitted by the diameter of the hole in the product must be considered for chip evacuation and circumferential motions.
Because of the restrictions in boring stability, more caution must be used in manufacturing training and scheduling. Knowing how the tool shape and cutting data selected affect cutting forces, as well as how different kinds of boring bars and tool clamping affect instability, bending, and vibration may be maintained to a minimum.

Cutting Forces When it comes to confrontation,
The displacements are caused by the tangential and radial cutting forces attempting to push the tool away from the workpiece.
The tool will be pushed lower and away from the centerline by the force generated according to the article how to use a boring bar on a lathe. The clearing angle will be lowered due to the bending of the internal hole diameter.
As a result, while working with tiny diameter holes, the clearance angle of the insert must be adequate to prevent contact here between the tool and the holes walls.
The cutting depth will be reduced due to the radial deflection. The particle size will alter with the variable size of the cutting forces, in addition to irreconcilable precision. Percussion is transmitted from the forefront of technology to the tool holder as a result of this boring bar lathe. The amplitude of the vibration and whether it is increased or suppressed will be determined by the tool’s and clamping’s durability.
Last but not least,
Understanding a few variables about the instrument before beginning is usually beneficial for a good and exact operation on how to use a boring bar on a lathe. It also improves the overall comfort of your operation.
I hope you will find this information useful the next time you attempt to utilize a drilling bar mostly on the lathe.
FAQ
What is the purpose of a boring bar?
This is the most integrated question of how to use a boring bar on a lathe. The cutting of an inner surface is done using a boring bar. It can drill a hole with a large diameter, a precise diameter, and high surface roughness.
Can you drill with a lathe?
Using The Center Lathe to Drill with the use of a drill chuck adapter, a lathe’s tailstock may be utilized for drilling. This drill chuck features a cipher tapering shaft that may be pushed into the tailstock shaft to secure it in place. If a big dimension hole is required, a tiny hole is initially drilled.
Can I use a spade bit on a lathe?
A split point aids in the creation of a well-centered hole. I use a spade bit for everything except pen blanks. Yes, the cheap spade parts that you throw away when they go dull. I start by drilling with a lesser bit size, then switch to my more costly Foresters.