
When installing chucks on a benchtop metal lathe, even the most experienced users have some difficulties, since it’s common for a lathe to have issues while installing chucks. After multiple efforts, some users fail to install chucks effectively. We will discuss lathe chuck mounting types accordingly.
This is because they lack direction. On the other hand, it won’t be an issue for you as well. So that means we’ve got to talk about many sorts of lathe chuck mounting techniques in this post.
There are already three different mounting techniques, depending on your application’s requirements. It’s also crucial to know about every single one of them. In order to make this process as easy as possible, we will attempt to describe the steps in the simplest terms.
Historical references of lathe chuck mounting types
Most of the initial work holding devices for lathes included and within the holding, as well as makeshift methods for anchoring the headstock spindle. Some old spike-style centers are still in use on wooden lathes. Some ad hoc attaching techniques in the past comprised any of the following: nailing, tying with leather or rope, clamping (a fancy term for pinning/wedging/clenching), or dogging down (an even fancier term for pinning/wedging/clenching).
Faceplates are likely at least as old as medieval clockmakers, who are believed to have used them to disguise the mechanical workings of their timepieces.
Face piece work has led employees to visualize sorts of clamps or dogs for the facepiece that could be opened and closed rather than having to do repetitive disassembly and reassembly. In the beginning, a lathe chuck mount type was merely a lump of wood. In the years before 1703, it was possible to say that Chocks, which relate to the Screw-Mandrel, were in use.
However, if you want to buy some good quality beginner wood lathe, then we have a wood lathe compilation that may boast your woodworking experiences.
Before the year 1807, the term lathe chuck mounts had evolved to the term universal Chuck, referring to the device that is attached to the end of the lathe spindle types and which is used to hold any form of work.
Alexander Bell has received a silver medal from the Society for the Encouragement of Arts, Manufactures and Commerce, as well as ten guineas (equal to $802 in 2019).
Instruments with 3 screws that extend from the flat surface, making an equal distance, may be rotated from the center to points on each side of the center.
Neither a scroll nor any other mechanism is known to have been used to transport them “equitably”. Two years later, the same organization awarded T. Hack a silver medal for a four-jaw chuck. Simon Fairman (1792–1857) created a scroll lathe chuck mounting type that was easy to operate on lathes like Bolton lathe, which is still in use today. The patent only mentions assembly techniques, and he does not claim that he invented the scroll (“convolute grooves”). Cushman Manufacturing was founded by his son-in-law, Austin F. Cushman (1830–1914), who was known for promoting the concepts and marketing chucks.
1. Install drill chucks
For quick and easy installation, use drill lathe chuck mount types. No problem at all will be required to install these chucks.
To make anything, all you need is a vise and a hammer. And how will you place it? Using heat or using cold are the only ways to proceed in this case. We’d rather it be hot. No particular reason? It takes less time to complete. However, there are other individuals who like the more gradual method of cooling types of chucks.
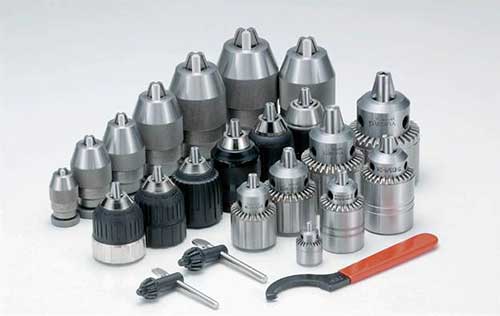
We are on the same page when it comes to the use of heat. You should have a heat gun or blow torches if you use heat like us. Even if you prefer the process of being cooled, you will still need a kitchen freezer.
To install using a drill chuck, you need the easiest sort of attach. Like the lathe chuck types on your power drill, they function in the same manner. To input a new tool, you use a clamp to keep an item in place and spin the other way. The drill lathe chuck mount is the key component of lathes because it provides a stable gripping platform for the revolving workpiece.
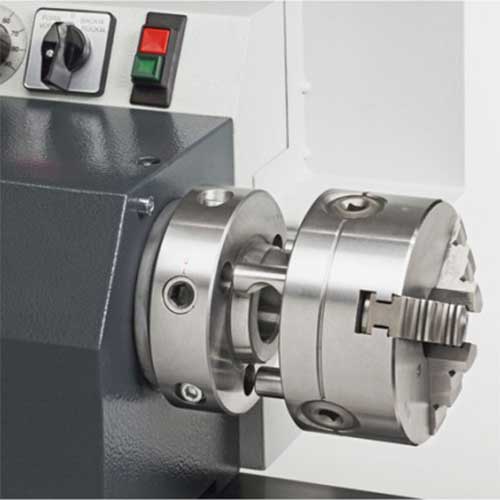
2. Installing Jawed Chucks
The mounting techniques for jawed chucks have recently proliferated. Discuss some of these with me.
Each jawed direct mount lathe chuck concept comes with a conscience feature. Jawed chuck mounts, which are available in both keyed and keyless versions, are commonly loosened and tightened by hand alone.
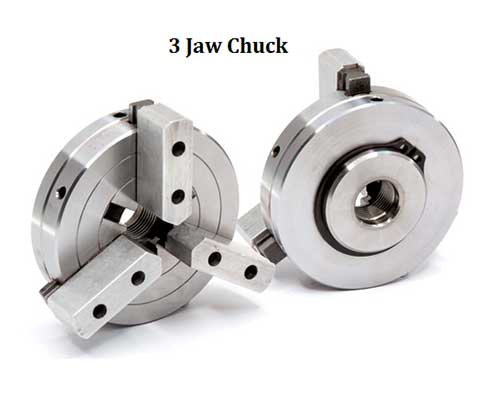
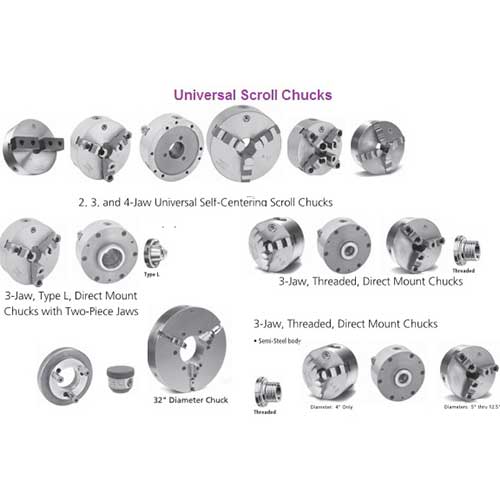
When you tighten the jaw on either the tool or the workpiece, you have successfully locked either item in place. Some call this form “universal chuck,” which is found in a variety of workshops and machine shops.
Plus, to let your know, Powermatic lathes are quite amazing in terms of quality and eminence. So if you want to know more about these, then you can take a glance at our review article over here.
A perfectly threaded screw nose
This lathe chuck mounting type will mean that the backplate will be necessary for the procedure. You must thread the backplate. Make sure you connect the lathe chuck mounting plate to the threaded spindle nose. It will require a lot of your time, but the method is simple.
We believe it would be a waste of your time and work. You must be doing something wrong if you cannot find a better option to make your tasks simpler and take less time.
However, since it has been in use for a long time, we believed it was important to include it as you can do on the grizzly lathe.
Narrowly tapered nose
We’d claim that jawed chucks like it.
You’ll be able to finish your project in less time and effort. The conscience taper must be placed on the male taper in this instance. The whole system’s repeatability increases as a result of the procedure.
The cam-and-lock-shaped spindle has a fluted nose
This is another useful means of holding the chuck in place. I know, however, I am being completely honest and state that it is nothing more than a slightly modified form of the tampered lathe spindle nose types approach. You must apply force to the lathe chuck types as you rotate them in this approach.
The mounting procedure for jawed chucks has been rather popular lately. There is only one conclusion to be drawn: Give this strategy a try if you haven’t made up your mind.
Mounting: three collet chucks
These spindle chuck mounts have arrived back. The feature that differentiates this lathe chuck mounting type that’s how it operates to keep the workpiece stationary. A chuck, also known as a lathe spindle thread size, includes sleeves or collars that are flexible, making it easier to hold the tool or workpiece. Under normal working circumstances, this keeps everything within place via static friction.
When you need parts for your workshop, our services are here to assist. To go along with our excellent assortment of equipment, parts, and accessories, we offer a large assortment of wood and metal lathe chucks for sale. Visit see our online store, go to our online store page.
For those who are unfamiliar, Collet chucks are a little different from the other two. The prior ways for mounting these sorts of chucks should not be discounted, just because it doesn’t imply you should do it with this sort of chuck.
The techniques used for jawed and drill chucks may come as a surprise to you, but it’s OK.
Moreover, we have a bets midi lathe compilation that may give your amazing experiences. So, you can take a look at our article.
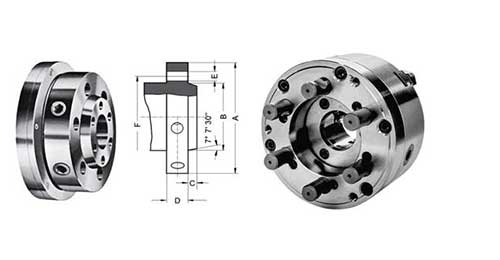
At the same time, collet chucks are almost always paired with specific mounting systems for the lathe. You can quickly attach the chuck to a lathe using the collet-closer mechanism that comes with it.
Backplates were omitted since the collet-closer mechanism now includes one. The shaft comes with a taper that is compatible with the male end. So, what is it for?
Since it will be carried by a matching male taper, this will be known as a “Matching Male Taper” Alternatively, the sleeve may be there. A hollow drawbar is included. It will pass through the headstock and travel the length of the instrument.
The closing mechanism is placed there, and you’ll notice that the mechanism is already engaged. This is the mechanism that allows the collet to open and shut quickly.
In regards to lathe tools and power tools, connecting chucks to the spindles or tables have been handled in several methods through the years.
Drilling: Inserting the drill chuck.
Threaded chucks accept threaded arbors.
To cut threaded rods, use a tapered arbor (one that holds itself) in the chuck.
Some ways for removal and insertion may include a variety of equipment and devices:
These lathe chuck mounting types will all help to hold things steady while you work: A vise, particularly with a wooden jig or soft jaw built for this purpose, a hammer, particularly a nonmarring hammer or rubber mallet, and an arbor press or shop press will all help hold things steady while you collaborate (the latter two require skill to avoid damaging the chuck).

Treatment options: heat (either using heat guns, blowtorches, or ovens) and then cold (via kitchen freezers, winter weather, or decompression of compressed air or nitrogen).
The hollow drill chuck may connect straight to the lathe’s threaded spindle nose. However, you can even try these with your jet 1440 lathe.
Attachinglarger jawed chucks to the work
Taper the nose of the tapered spindle with a threaded retainer. With a spanner wrench, the retention ring is being severely strained.
A threaded lathe spindle nose type (for lathe operations) or an adapter plate with the same nose, both of which have threads, may be screwed onto a backplate with threads. Threaded spindle nose installation was the most popular mounting technique throughout the 19th and early 20th centuries.
though the level of control on concentricity is sufficient for work at a fast speed and accuracy, it’s not quite precise enough for a high-precision job (high precision can be achieved, but the time and skill involved in the setups make it a poor choice now that better options exist, such as the cam-lock spindle noses described below).
Industrial equipment solely of the low-end sort is still used in the production of threaded spindle noses (hobbyist, least-expense MRO, etc.). In high-capital production, the low-unit-cost system has been replaced by the mid-to-high-volume method, in which high-precision items have lower component counts. One technique to deal with the roundness on the threaded spindle nose is by using the exact-adjust (Set-Tru) approach.
Typically, when using smaller lathes, a flanged end of the spindle is arranged in a concentric circle and is connected to a central elevated circular register, which has a corresponding hole in the chuck or its backplate. In the female register of the chuck, the registration is normally shallow and has parallel sides, and it may be fitted with a gentle push.
Because the chuck does not change the alignment, which is given exclusively by the register, it is fastened using bolts inserted through clearance holes that do not alter the position. With great reproducibility, this setup works well in a production setting, although it is much slower in this instance.
On the corresponding male taper of the tapering spindle nose (for lathe operations) or of an adapter plate with the same nose, a backplate with a female (self-releasing) taper may be used. This improved technology achieves repeatable stability largest to the lowest TIR value.
Plus, do you know what a midi lathe is? If you don’t, then we have an article to make to more comfortable with these types of lathe.
Wrap up words
That’s all you really need to know about lathe chuck mounting types procedures. However, we must warn you: But you should understand that in order for the chuck to work properly, it must be installed in the appropriate manner.
It might produce difficulties for you and your computer if you choose this. It would be sensible to use the chucking techniques on the chosen pieces.
Even so, you shouldn’t run into any problems if you follow the directions perfectly. We will check whether you’ve commented, but if you have, tell us about it in the comments area.
I’m sure you’ll be thrilled to know that you can make comment on the post if you need any more help.